
✧
Piercing Aftercare
-
1. SOAK
Using a pre-made sterile saline wound wash. Begin by spraying the piercing directly on both sides, ensuring any debris (crusties, dried blood, etc) on the jewelry and your skin are wet and softened for an easier cleaning experience. Do not touch, twist or pick at your piercing. This will lead to irritation and can delay the healing process.
We recommend using the Piercing Aftercare Mist by Neilmed.
-
2. CLEAN
Spray and saturate a new Q-Tip (or sterile gauze) with your pre-made saline spray. Gently, remove any debris or dried blood from the front and the back of the piercing, being careful to not pull/twist your piercing excessively in the process.
For larger jewelry, the backing of your post can be gently pushed forward to clean underneath harder to reach areas. Warm water in the shower is also a great way to rinse away any hard to reach debris.
-
3. DRY
As a final step, using a clean Q-Tip (or sterile gauze), gently dab the area DRY, this ensures no moisture is left on the piercing. This is also recommended after showering, as any moisture left on the piercing can cause irritation.
✧
Aftercare Tutorial

✧
What to Avoid
-
- DO NOT use anything other than a Sterile Saline Wound Wash to clean your piercings. We do NOT advise cleaning with Betadine®, Hibiclens®, isopropyl alcohol, hydrogen peroxide, Dial® or other soaps containing triclosan. Chamomile tea, tea-tree oil, crushed acetaminophen or ibuprofen paste is also very harsh and can lead to severe irritation or infection. We DO recommend using NeilMed’s Piercing Aftercare Mist.
- DO NOT sleep directly on the piercing: This can cause cartilage piercings such as helix or flats to heal on an angle. There is no way to fix this, other than removing the piercing and re-piercing the area again.
- DO NOT submerge your new piercing in bodies of water such as a pool, lake, hottub, bathtub, etc. We advise waiting a minimum of 2 months to submerge a new piercing in any body of water. These bodies of water contain contaminants and bacteria. Water in the shower is acceptable, as this is a constant stream.
- DO NOT touch, twist, spin or remove your jewelry during the healing process.
- DO NOT over-clean your piercing: This can delay the healing process and cause irritation. Remember to clean the piercing no more than 2x a day.
- DO NOT pick at and/or forcefully removing debris or ‘crusties’ from the jewelry/piercing area.
- DO NOT leave moisture sitting on your piercing. This includes after cleaning your piercing with saline or after a shower.
✧
Your Piercing
Collapsible content
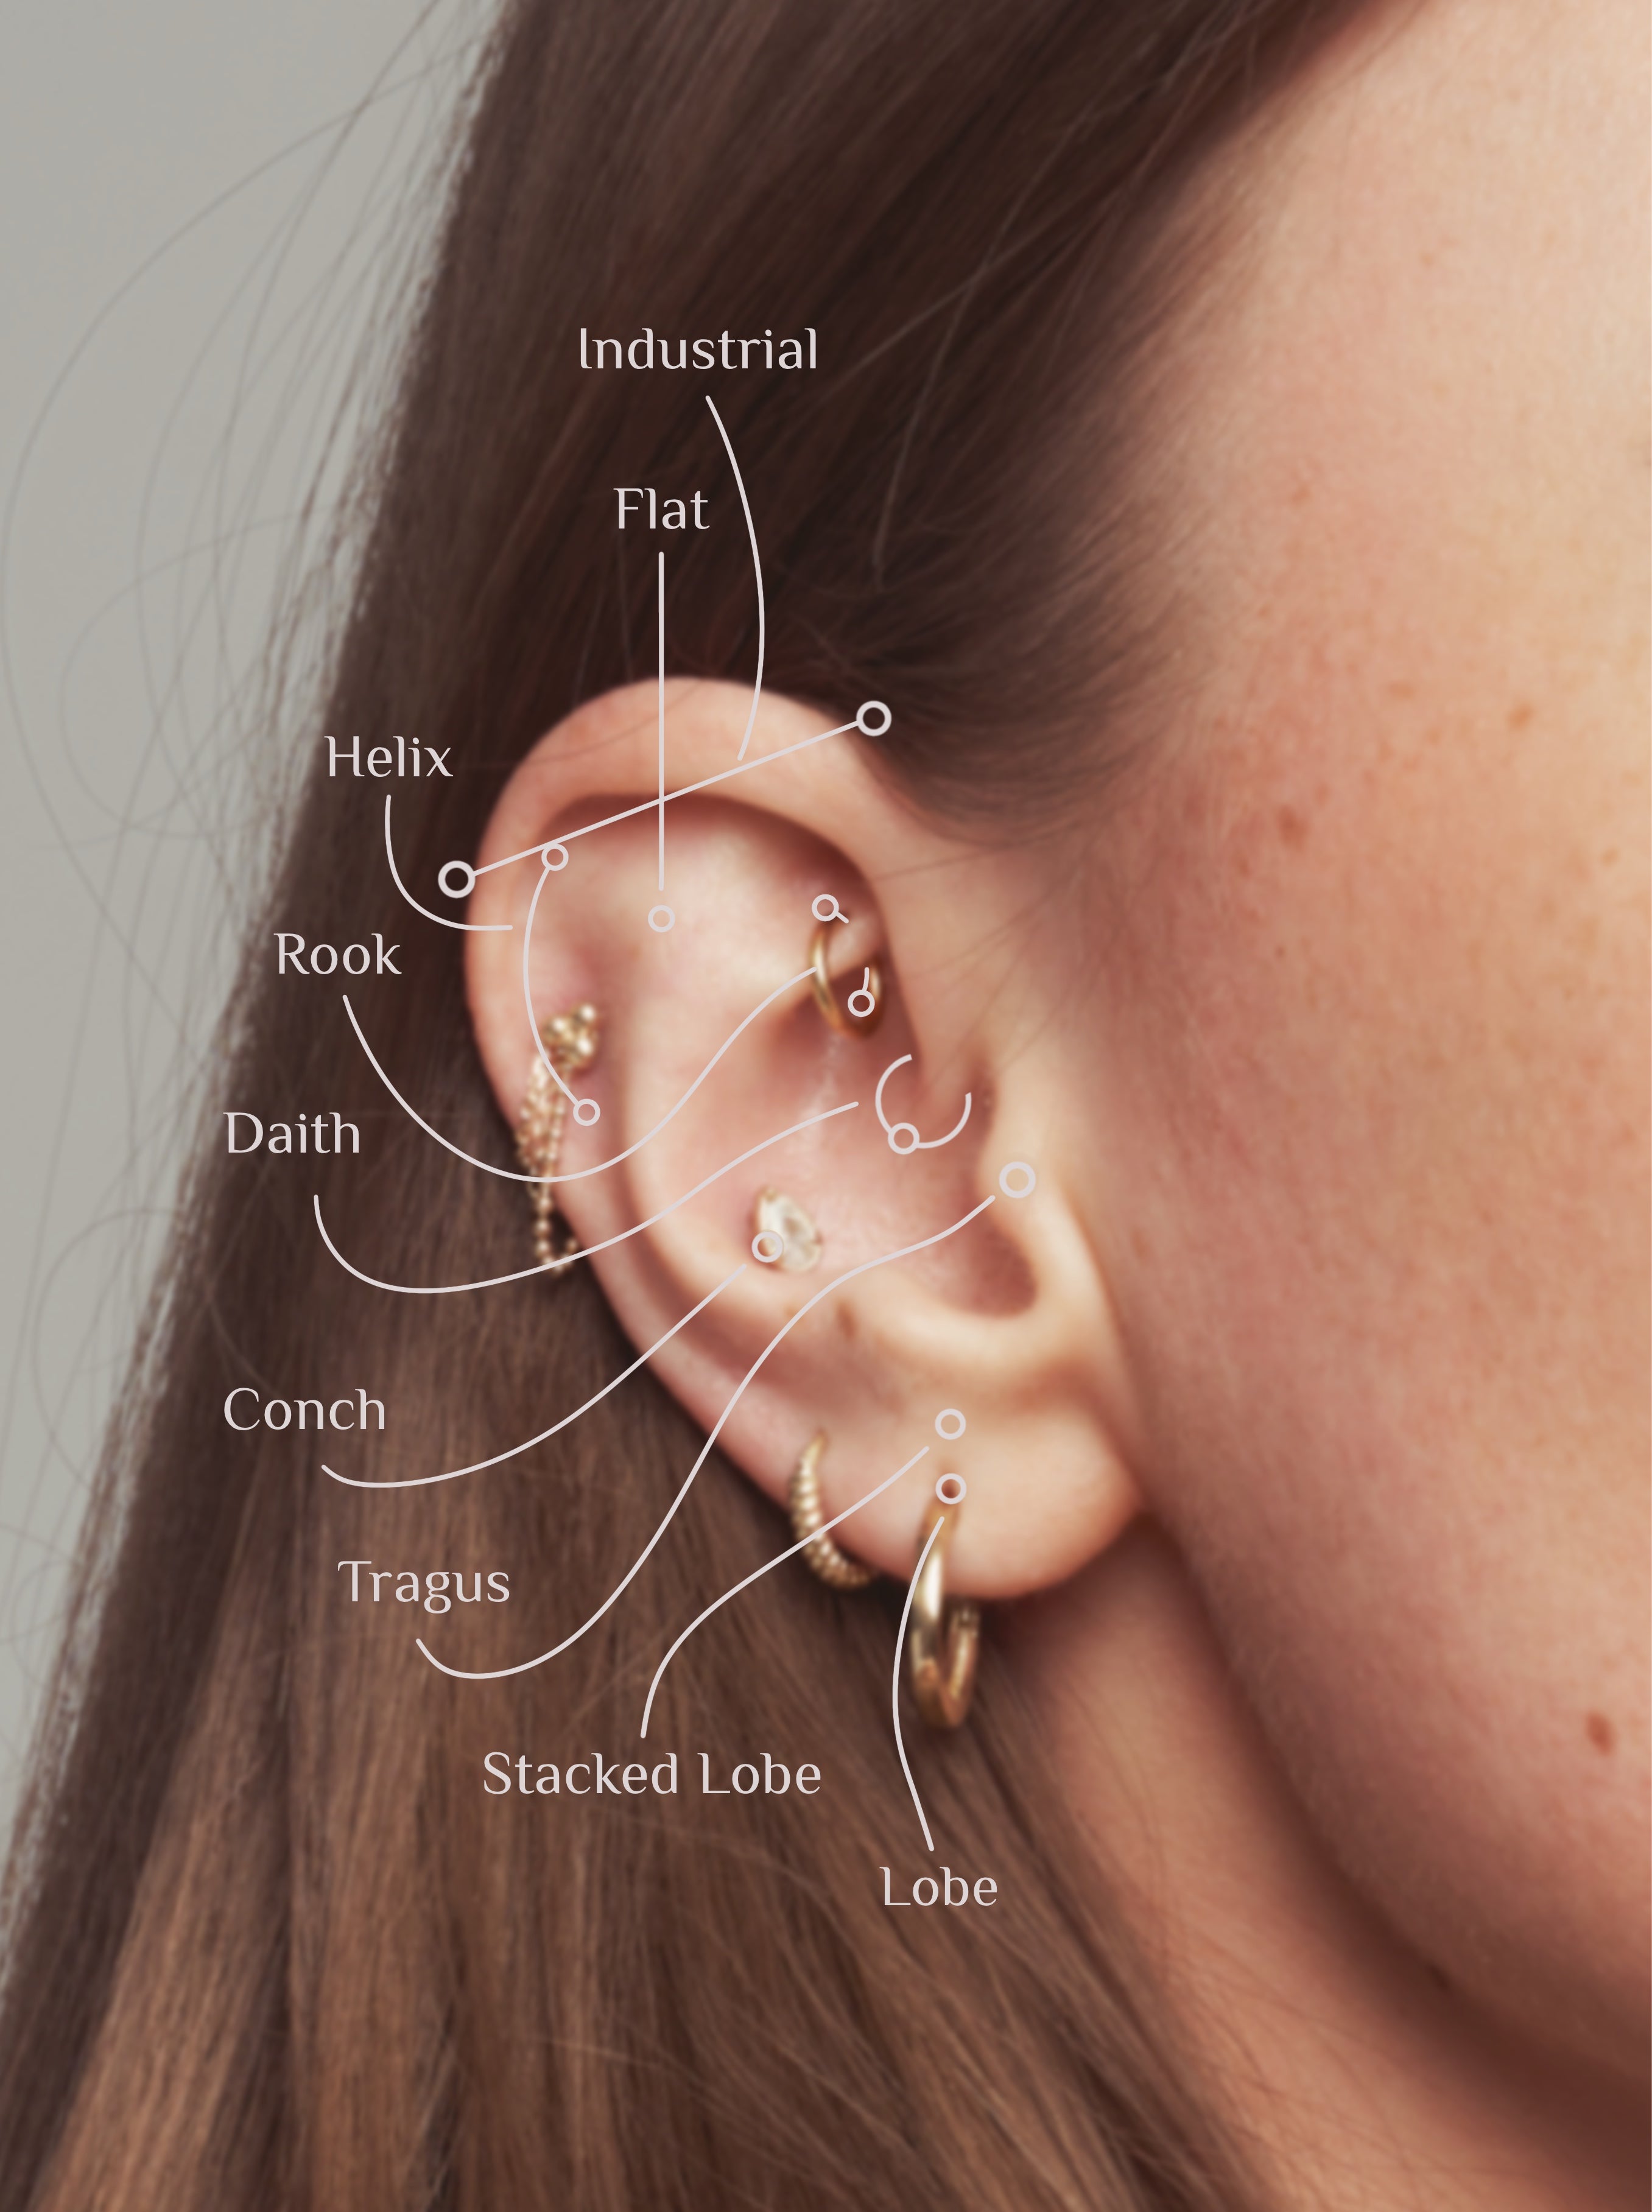
HELIX & FLAT
Healing time: 9-12 months
Downsize: 1 month
Helix and Flat piercings are initially pierced with longer bars (typically, a flat back labret post) to accommodate for swelling. Sleeping on this piercing, especially when they have not yet been downsized, can cause the issue of the piercing healing crooked, in some cases, the piercing will never heal. Downsizing your piercing is a vital and important step to avoid these issues!
LOBE
Healing time: 6 months
Initial swelling, bleeding and bruising is quite common with lobe piercings, this will typically subside within the first 3-4 weeks. During the healing process, it is important to remember to not touch, twist or pick at the piercing. This can irritate your piercing, and prolong the healing process.
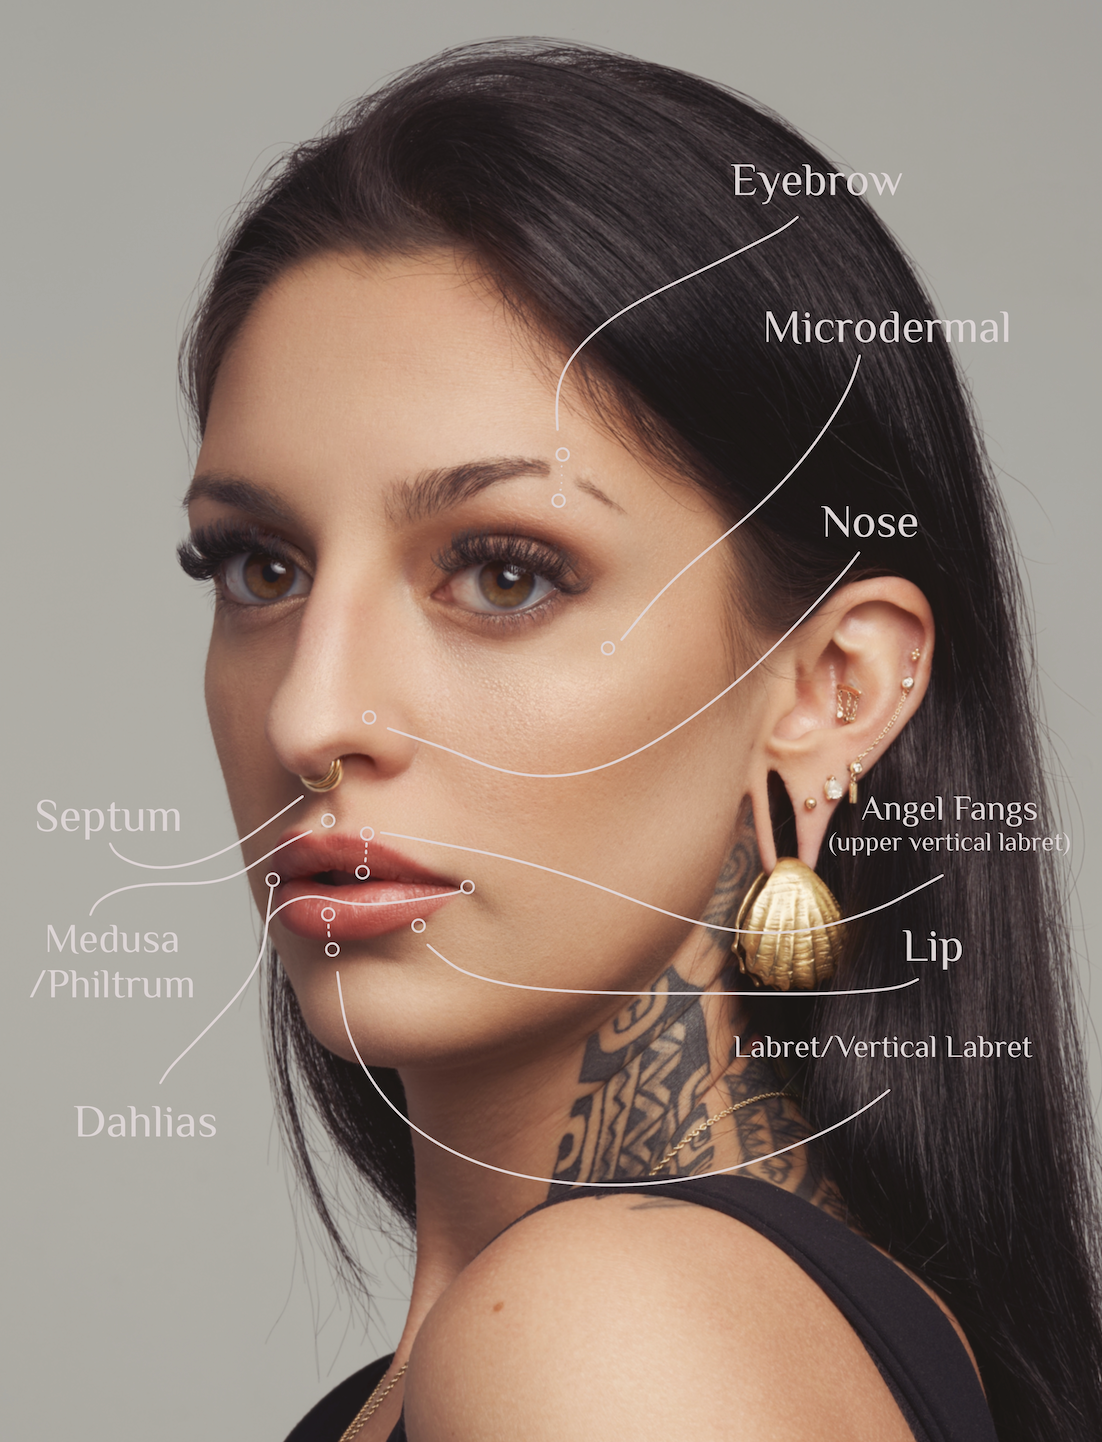
NOSE
Healing time: 6 months
Downsize: 1 month (optional)
As nose piercings tend to snag on things such as blankets and pillowcases, for this reason, we recommend placing a small circular bandaid over the piercing for the first few weeks of healing while you sleep. This will act as a gentle barrier between your nose stud and anything that can cause irritation. The piercing should be cleaned with saline and thoroughly dried before applying the new band-aid.
There are a few things to avoid with nose piercings that tend to cause irritation during the healing process.
- Facial products on or around the piercing for the first 2-3 months, including; cleansers, skin care and makeup.
- Face cloths, fluffy towels and exfoliating mitts. These have small loops and fibers that can be easily snagged on your jewelry and tend to harbour bacteria.
EYEBROW
Healing time: 4-5 months
Downsize: 2-4 weeks
Eyebrow piercings are highly anatomy based, and can be a difficult healing process for some. Bruising and swelling is quite common, at times a downsize is required after 2-4 weeks.
With clean hands, always remember to check the tightness of your beads before going to bed! These can wiggle loose from being adjusted and cleaned over time.
SEPTUM
Healing time: 2-3 months
Wait to change: 1-2 months
Initial septum piercings are done with a horseshoe barbell, this jewelry will accommodate for any swelling that may occur. Your initial piercing jewelry should be left in place for a minimum of 1 month before being switched by your piercer, especially if your end goal is a fitted hoop. It is recommended to have your piercer change this piercing as it can be difficult to change on your own.
With clean hands, always remember to check the tightness of your beads before going to bed! These can wiggle loose from being adjusted and cleaned over time.
NAVEL
Healing time: 9-12 months
Navel piercings will likely be tender, red and bruised within the first month of healing. During the healing process, we typically advise avoiding high waisted pants as they can catch on the jewelry and cause irritation to your piercing. A loose fitting, lower waisted or a softer material type of pants is recommended instead.
Be sure to DRY your navel piercing, it is a very crucial step in the healing process. Dabbing the area with a clean dry a-tip or sterile gauze is recommended after any encounter with moisture (after cleaning with saline wound wash or after a shower). Leaving moisture on your navel piercing can harbour bacteria and lead to infection and or severe irritation. Avoid submerging this piercing in any bodies of water (lakes, pools, bathtubs etc.) for a minimum of 2 months.
With clean hands, always remember to check the tightness of your beads before going to bed! These can wiggle loose from being adjusted and cleaned over time.
NIPPLE
Healing time: 9-12 months
Downsize: 4 months (optional)
It is recommended to wear a soft sports bra or tank top for the first few months of healing. This light compression is usually more comfortable as it can aid with any sensitivity or snagging that may occur, especially in your sleep. Initial swelling, bleeding, tenderness and bruising around the nipple is very normal for the first 1-2 months of healing. Be sure to avoid touching and moving the jewelry excessively as this will cause irritation, and remember to dry the area off after any encounter with moisture.
ORAL PIERCINGS
Healing time: 4-5 months
Downsize: 2 weeks
Swelling in lip piercings is expected and can last for 2-3 weeks. The initial jewelry will be long to accommodate for this swelling. It is a crucial step in the healing process to have this longer initial jewelry downsized to a shorter bar, typically after 2 weeks. Leaving the longer jewelry in for an extended amount of time can lead to difficult healing, permanent damage to teeth and gums, and in some cases; causing the piercing to migrate/reject.
As for cleaning any oral piercing, we recommend using alcohol-free mouthwash morning and night (twice a day). If there is any portion of the piercing on the exterior of the mouth, sterile saline wound wash is recommended, twice a day, gently cleaning away any debris on the jewelry. Eating foods you have to bite into or spicy/acidic foods can cause discomfort and irritation during the healing process. Avoid all oral contact, rough play, and contact with others' bodily fluids on or near your piercing during healing.
VCH
Healing time: 4-6 weeks
Swelling, tenderness, redness and light bleeding is very common during the first week or so of healing. A gentle stream of warm water in the shower can also be used in place of saline, avoiding any soaps or other hygiene products on or around the area. Avoid sexual contact/intimacy for the first 3-4 weeks of healing.
MICRODERMAL
Healing time: 4-5 months
The first 2 weeks of healing a dermal are the most tedious and require very thorough aftercare.
During the first week of healing, it is very important to wear a small circular band-aid over your piercing at all times, ensuring changing morning and night after each cleaning.
In the second week, the circular band-aid should be applied only at night when your jewelry is most at risk to be snagged or caught. This is because the tissue around the base of the jewelry needs time to heal, close and secure the microdermal in place. Until this happens, your piercing is at very high risk of falling out or healing on a poor angle - leading to early migration of the dermal. These should be gently cleaned with sterile saline and thoroughly dried morning and night for the first 2 months of healing. Bleeding and bruising are very common and can last for weeks depending on the area your dermal is placed.
Changing your dermal top should only be done by a professional body piercer after a minimum of 9 months of healing and no more than 1-2 times a year. Changing this too often can lead to rejection of the piercing.
✧
Saline Solution Recipe
-
Please note that a pre-made Sterile Saline Wound Wash is always recommended.
If you are making your saline solution at home, ensure you are making it fresh each time.
- Dissolve 1/8 to 1/4 teaspoon of non-iodized (iodine free) Sea Salt, or Pink Himalayan Salt (no other form of sea salt is acceptable), into one cup of warm distilled or bottled water, NOT tap water!
- Be precise with your ratios. A stronger mixture is not better, as it will be too hypertonic (strong) and can irritate the piercing.
- You can dip sterile gauze or Q-tips in the solution to clean the area. You must try to avoid contaminating the solution, so no double dipping!